레이아웃(Layout)이란?
레이아웃은 여러 뷰들을 포함하고 배치하는 역할을 하며, 레이아웃 클래스는 모두 ViewGroup 클래스로부터 상속 받는다.
따라서 View 클래스와 ViewGroup 클래스의 메소드와 필드 모두 사용 가능하다.
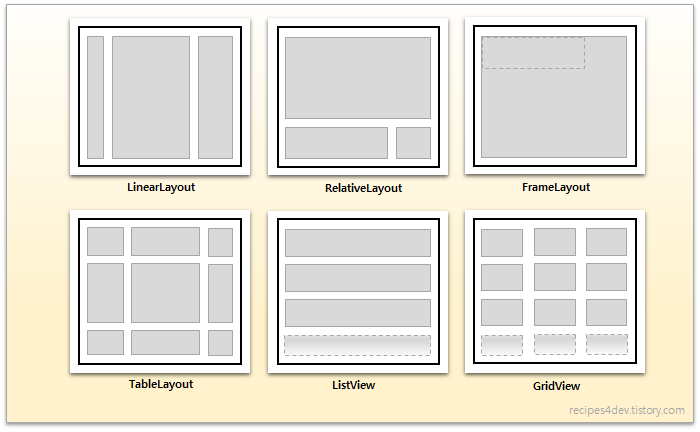
| 레이아웃 클래스 | 설명 |
| LinearLayout | 자식들을 수직이나 수평으로 배치 |
| TableLayout | 자식들을 테이블 형태로 배치 |
| GridLayout | 자식들을 바둑판 모양으로 배치 |
| RelativeLayout | 자식들을 부모나 다른 자식에 상대적으로 배치 |
| ConstraintLayout | 자식들을 부모나 다른 자식에 상대적으로 배치 |
| TabLayout | 탭을 이용하여서 겹쳐진 자식 중에서 하나를 선택 |
| AbsoluteLayout | 절대 위치로 배치 |
| FrameLayout | 모든 자식들을 겹치게 배치 |
선형 레이아웃(Linear layout)이란
가장 기본적인 배치 관리자로, 자식 뷰들을 수직 또는 수평으로 배치한다.
| 속성 | 관련 메소드 | 설명 |
| orientation | setOrientation(int) | "horizontal"은 수평, "vertical"은 수직으로 배치 |
| gravity | setGravity(int) | x축과 y축 상에 자식을 어떻게 배치할 것인지 지정 |
| baselineAligned | setBaselineAligned(boolean) | false로 설정되면 자식뷰들의 기준선은 정렬하지 않음. |
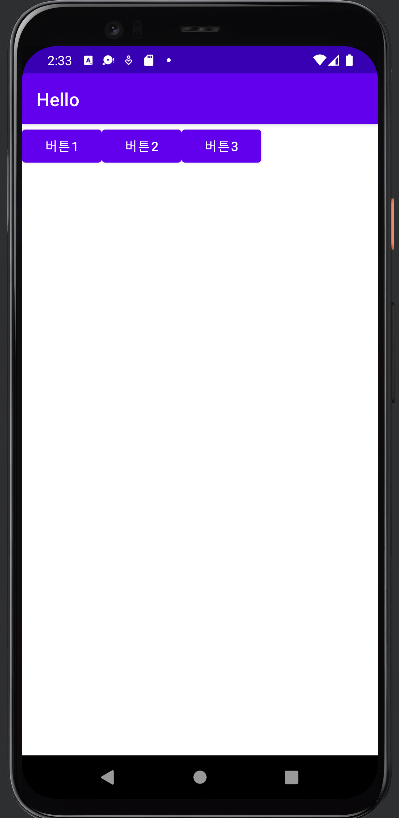
LinearLayout을 이용한 수평으로 자식 뷰 배치
orientation 속성이 어떻게 정의하느냐에 따라 수평이냐 수직이냐가 결정된다.
아래의 왼쪽은 orientation = "horizontal"로 되어 있어, LinearLayout에서 자식 뷰들이 수평인 가로 방향으로 배치된다.
오른쪽은 orientation = "vertical"이다.

<?xml version="1.0" encoding="utf-8"?>
<LinearLayout xmlns:android="http://schemas.android.com/apk/res/android"
    xmlns:app="http://schemas.android.com/apk/res-auto"
    xmlns:tools="http://schemas.android.com/tools"
    android:orientation="horizontal"
    android:layout_width="match_parent"
    android:layout_height="match_parent"
    tools:context=".MainActivity">

    <Button
        android:layout_width="wrap_content"
        android:layout_height="wrap_content"
        android:text="버튼1"
        />
    <Button
        android:layout_width="wrap_content"
        android:layout_height="wrap_content"
        android:text="버튼2"
        />
    <Button
        android:layout_width="wrap_content"
        android:layout_height="wrap_content"
        android:text="버튼3"
        />
</LinearLayout>
LinearLayout의 Gravity 속성
선형 레이아웃 안에 배치되는 자식 뷰들의 배치는 선형 레이아웃의 gravity 속성에 의해 영향을 받는다.
gravity의 원래 뜻은 중력으로, 말 그대로 중력처럼 자식 뷰들을 끌어당긴다.
gravity를 이용해 자식 뷰를 화면의 중앙에 배치하거나 상단과 하단에 배치할 수 있다.
| 상수 | 값 | 설명 |
| top | 0x30 | 객체를 컨테이너 상단에 배치 |
| bottom | 0x50 | 객체를 컨테이너 하단에 배치 |
| left | 0x03 | 객체를 컨테이너 좌측에 배치 |
| right | 0x05 | 객체를 컨테이너 우측에 배치 |
| center_vertical | 0x01 | 객체를 컨테이너 수평의 중앙에 배치 |
| fill_horizontal | 0x07 | 객체를 컨테이너 수평을 채우도록 배치 |
| center | 0x11 | 객체를 컨테이너 수평, 수직의 중앙에 배치 |
| fill | 0x77 | 객체가 컨테이너를 가득 채우도록 배치 |
Gravity 속성을 사용해 중앙에 배치하기
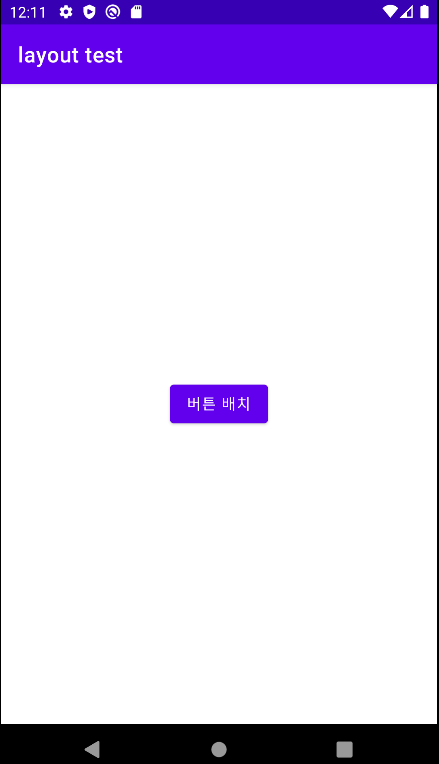
<?xml version="1.0" encoding="utf-8"?>
<LinearLayout xmlns:android="http://schemas.android.com/apk/res/android"
    xmlns:app="http://schemas.android.com/apk/res-auto"
    xmlns:tools="http://schemas.android.com/tools"
    android:layout_width="match_parent"
    android:layout_height="match_parent"
    android:orientation="vertical"
    android:gravity="center"
    tools:context=".MainActivity">

    <Button
        android:id="@+id/buton01"
        android:layout_width="wrap_content"
        android:layout_height="wrap_content"
        android:text="버튼 배치"
        />
</LinearLayout>
android:gravity를 줄 때, android:layout_gravity도 사용이 가능한데, layout이 붙는 속성들은 뷰에 의해서 사용되는 것이 아니라 레이아웃 객체에 의하여 사용된다. layout_gravity 속성도 레이아웃 객체가 사용하는 속성이기 때문에 버튼의 layout_gravity 를 "center"로 설정하여도 같은 결과가 나온다.
가중치(layout_weight)
선형 레이아웃의 자식 뷰에는 가중치를 부여할 수 있다. 가중치는 layout_weight를 사용하며 자식 뷰의 중요도를 정수로 나타낸다. 가중치의 비율에 따라 부모 뷰 안에 남아있는 공간이 할당되며, 가중치가 높을수록 더 크게 할당된다.
가중치를 지정하지 않으면 '0'의 값을 가진 것으로 가정하며, 확장되지 않는다.
가중치를 주면 남은 공간을 가중치의 비율에 따라 전부 차지하게 된다.
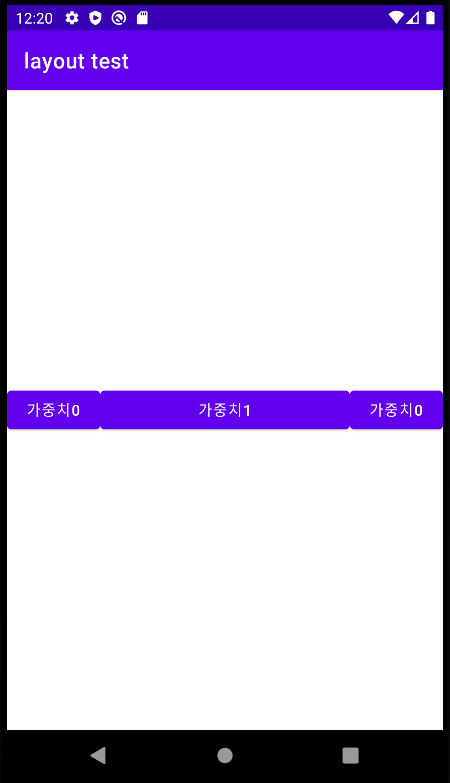
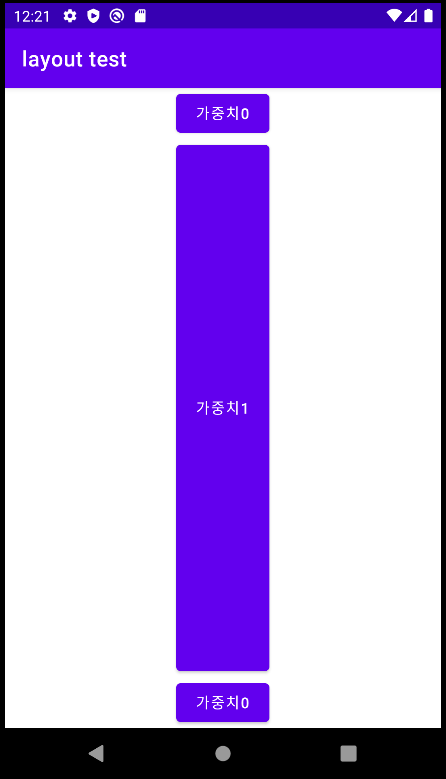
android:orientation을 "horizontal"과 "vertical"로 작성하였다.
<?xml version="1.0" encoding="utf-8"?>
<LinearLayout xmlns:android="http://schemas.android.com/apk/res/android"
    xmlns:app="http://schemas.android.com/apk/res-auto"
    xmlns:tools="http://schemas.android.com/tools"
    android:layout_width="match_parent"
    android:layout_height="match_parent"
    android:orientation="horizontal"
    android:gravity="center"
    tools:context=".MainActivity">

    <Button
        android:id="@+id/buton01"
        android:layout_width="wrap_content"
        android:layout_height="wrap_content"
        android:layout_weight="0"
        android:text="가중치0"
        />
    <Button
        android:id="@+id/buton02"
        android:layout_width="wrap_content"
        android:layout_height="wrap_content"
        android:layout_weight="1"
        android:text="가중치1"
        />
    <Button
        android:id="@+id/buton03"
        android:layout_width="wrap_content"
        android:layout_height="wrap_content"
        android:layout_weight="0"
        android:text="가중치0"
        />
</LinearLayout>
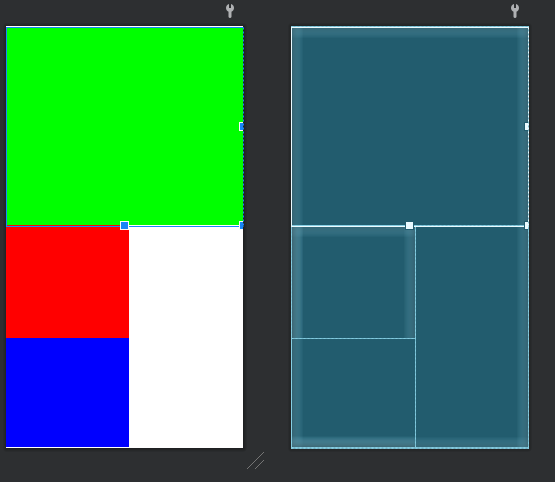
중첩 선형 레이아웃
복잡한 레이아웃의 경우 선형 레이아웃(LinearLayout) 안에 다른 선형 레이아웃(LinearLayout)을 넣어야 한다.
<?xml version="1.0" encoding="utf-8"?>
<LinearLayout xmlns:android="http://schemas.android.com/apk/res/android"
    xmlns:app="http://schemas.android.com/apk/res-auto"
    xmlns:tools="http://schemas.android.com/tools"
    android:layout_width="match_parent"
    android:layout_height="match_parent"
    android:orientation="vertical"
    android:gravity="center"
    tools:context=".MainActivity">

    <LinearLayout
        android:layout_width="match_parent"
        android:layout_height="344dp"
        android:background="#00FF00"
        android:orientation="horizontal"/>
    <LinearLayout
        android:layout_width="match_parent"
        android:layout_height="385dp"
        android:orientation="horizontal">

        <LinearLayout
            android:layout_width="214dp"
            android:layout_height="match_parent"
            android:background="#0000FF"
            android:orientation="vertical">

            <LinearLayout
                android:layout_width="match_parent"
                android:layout_height="195dp"
                android:background="#FF0000"
                android:orientation="horizontal"/>
        </LinearLayout>
    </LinearLayout>
</LinearLayout>
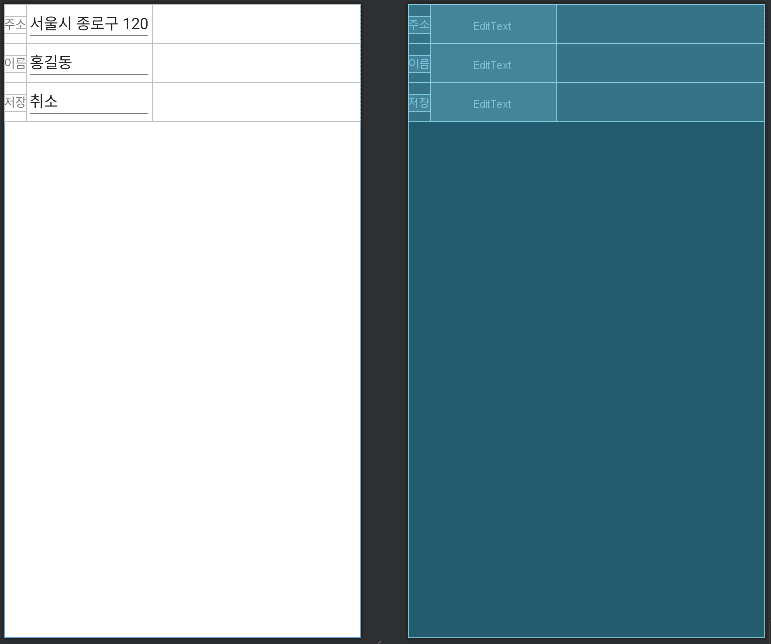
테이블 레이아웃(TableLayout)
테이블 레이아웃은 자식 뷰들을 테이블 형태로 배치한다. 테이블 레이아웃은 HTML에서 테이블을 표시하는 방법과 비슷하다. 하나의 테이블은 여러 개의 TableRow 객체로 이루어지고 하나의 TableRow 안에는 여러 개의 셀(Cell)들이 있고 하나의 셀 안에는 하나의 뷰 객체가 들어간다.
하나의 셀 안에는 또 다른 테이블 레이아웃이 들어갈 수 있다.
<?xml version="1.0" encoding="utf-8"?>
<TableLayout xmlns:android="http://schemas.android.com/apk/res/android"
    xmlns:app="http://schemas.android.com/apk/res-auto"
    xmlns:tools="http://schemas.android.com/tools"
    android:layout_width="match_parent"
    android:layout_height="match_parent"
    tools:context=".MainActivity">

    <TableRow>
        <TextView android:text="주소"/>
        <EditText android:text="서울시 종로구 120"/>
    </TableRow>
    <TableRow>
        <TextView android:text="이름"/>
        <EditText android:text="홍길동"/>
    </TableRow>
    <TableRow>
        <TextView android:text="저장"/>
        <EditText android:text="취소"/>
    </TableRow>
</TableLayout>
상대적 레이아웃(RelativeLayout)
자식 뷰의 위치를 부모 뷰나 다른 자식 뷰들에 상대적으로 지정하는 방법이다.
뷰들은 기본적으로 주어진 순서대로 그려진다. 이러한 순서 때문에 XML을 이용해 레이아웃을 지정할 때
기준이 되는 뷰는 상대적으로 배치하고자 하는 뷰보다 먼저 작성되어야 한다.
상대적 레이아웃은 중첩된 레이아웃을 사용하지 않아도 되므로 레이아웃 계층 구조를 평평하게 유지할 수 있다.
| 속성 | 설명 |
| layout_above | 만약 ture이면 기준 뷰의 위에 일치 |
| layout_below | 기준 뷰의 아래에 위치 |
| layout_centerHorizontal | 수평으로 현재 뷰의 중심을 부모와 일치 |
| layout_centerinParent | 부모의 중심점에 현재 뷰를 위치 |
| layout_centerVertical | 수직으로 현재 뷰의 중심을 부모와 일치 |
| layout_toLeftOf | 기준 뷰의 왼쪽에 배치 |
| layout_toRightOf | 기준 뷰의 오른쪽에 배치 |
| layout_alignTop | 기준 뷰의 위쪽과 맞춤 |
| layout_alignBottom | 기준 뷰의 아래쪽과 맞춤 |
| layout_alignLeft | 기준 뷰의 왼쪽과 맞춤 |
| layout_alignRight | 기준 뷰의 오른쪽과 맞춤 |
| layout_alignBaseline | 기준 뷰의 내용물의 아래쪽 기준선을 맞춤 |
부모(레이아웃)의 위치를 적용할 때 RelativeLayout 속성
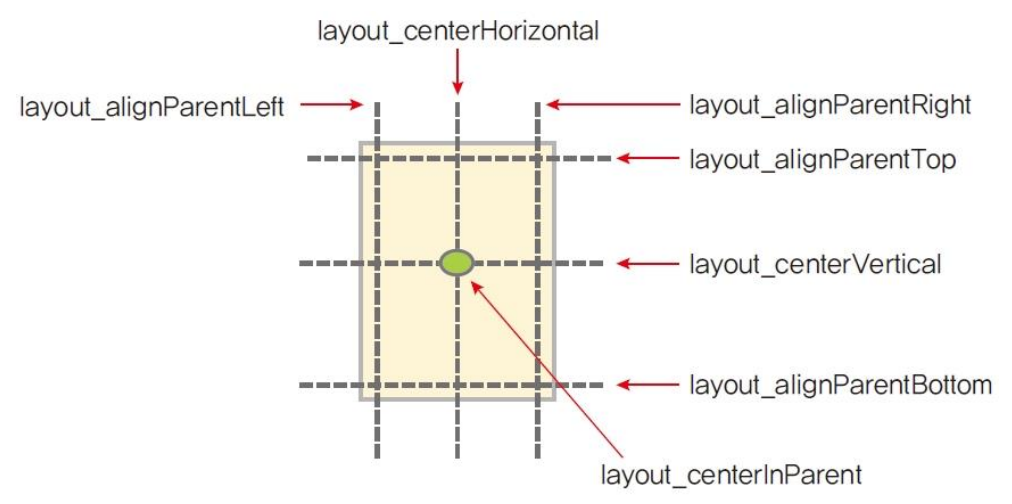
부모 기준으로 상대적 배치
예제)
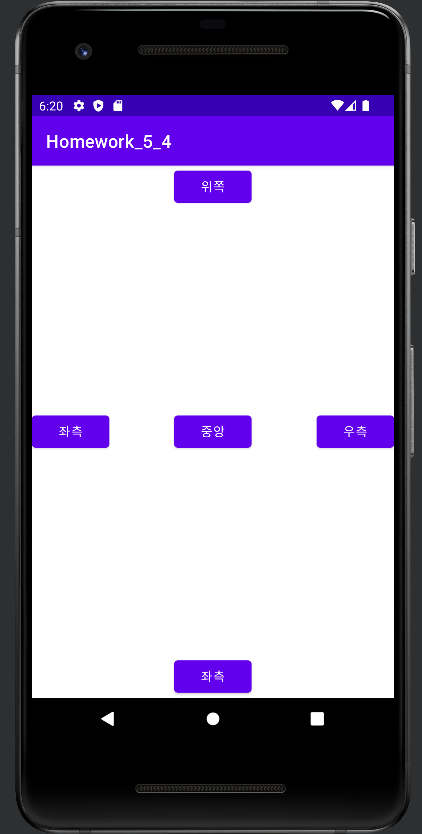
<?xml version="1.0" encoding="utf-8"?>
<RelativeLayout xmlns:android="http://schemas.android.com/apk/res/android"
    xmlns:app="http://schemas.android.com/apk/res-auto"
    xmlns:tools="http://schemas.android.com/tools"
    android:layout_width="match_parent"
    android:layout_height="match_parent"
    tools:context=".MainActivity">

    <Button
        android:layout_width="wrap_content"
        android:layout_height="wrap_content"
        android:layout_alignParentTop="true"
        android:layout_centerHorizontal="true"
        android:text="위쪽"/>
    <Button
        android:layout_width="wrap_content"
        android:layout_height="wrap_content"
        android:layout_alignParentLeft="true"
        android:layout_centerVertical="true"
        android:text="좌측"/>
    <Button
        android:layout_width="wrap_content"
        android:layout_height="wrap_content"
        android:layout_centerInParent="true"
        android:text="중앙"/>
    <Button
        android:layout_width="wrap_content"
        android:layout_height="wrap_content"
        android:layout_alignParentRight="true"
        android:layout_centerVertical="true"
        android:text="우측"/>
    <Button
        android:layout_width="wrap_content"
        android:layout_height="wrap_content"
        android:layout_alignParentBottom="true"
        android:layout_centerHorizontal="true"
        android:text="좌측"/>

</RelativeLayout>
다른 위젯의 상대적인 위치를 적용할 때 RelativeLayout 속성
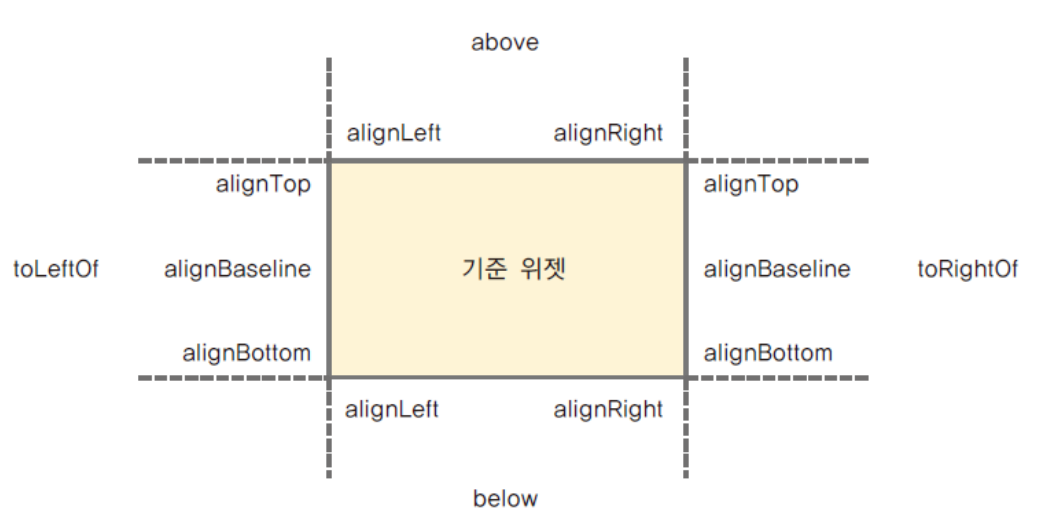
다른 위젯 기준으로 상대적 배치
예제)
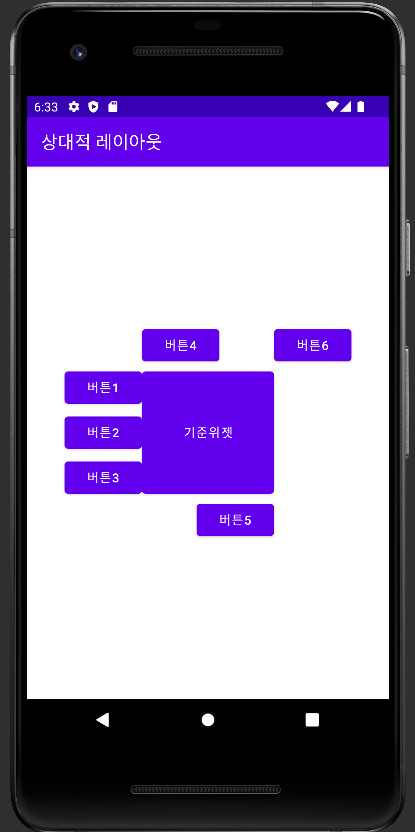
<?xml version="1.0" encoding="utf-8"?>
<RelativeLayout xmlns:android="http://schemas.android.com/apk/res/android"
    xmlns:app="http://schemas.android.com/apk/res-auto"
    xmlns:tools="http://schemas.android.com/tools"
    android:layout_width="match_parent"
    android:layout_height="match_parent"
    tools:context=".MainActivity">

    <Button
        android:id="@+id/baseBtn"
        android:layout_width="150dp"
        android:layout_height="150dp"
        android:layout_centerHorizontal="true"
        android:layout_centerVertical="true"
        android:text="기준위젯"/>
    <Button
        android:layout_width="wrap_content"
        android:layout_height="wrap_content"
        android:layout_alignTop="@id/baseBtn"
        android:layout_toLeftOf="@id/baseBtn"
        android:text="버튼1"/>
    <Button
        android:layout_width="wrap_content"
        android:layout_height="wrap_content"
        android:layout_alignBaseline="@id/baseBtn"
        android:layout_toLeftOf="@id/baseBtn"
        android:text="버튼2"/>
    <Button
        android:layout_width="wrap_content"
        android:layout_height="wrap_content"
        android:layout_alignBottom="@id/baseBtn"
        android:layout_toLeftOf="@id/baseBtn"
        android:text="버튼3"/>
    <Button
        android:layout_width="wrap_content"
        android:layout_height="wrap_content"
        android:layout_alignLeft="@id/baseBtn"
        android:layout_above="@id/baseBtn"
        android:text="버튼4"/>
    <Button
        android:layout_width="wrap_content"
        android:layout_height="wrap_content"
        android:layout_alignRight="@id/baseBtn"
        android:layout_below="@id/baseBtn"
        android:text="버튼5"/>
    <Button
        android:layout_width="wrap_content"
        android:layout_height="wrap_content"
        android:layout_toRightOf="@id/baseBtn"
        android:layout_above="@id/baseBtn"
        android:text="버튼6"/>
</RelativeLayout>

RelativeLayout 사용 예시
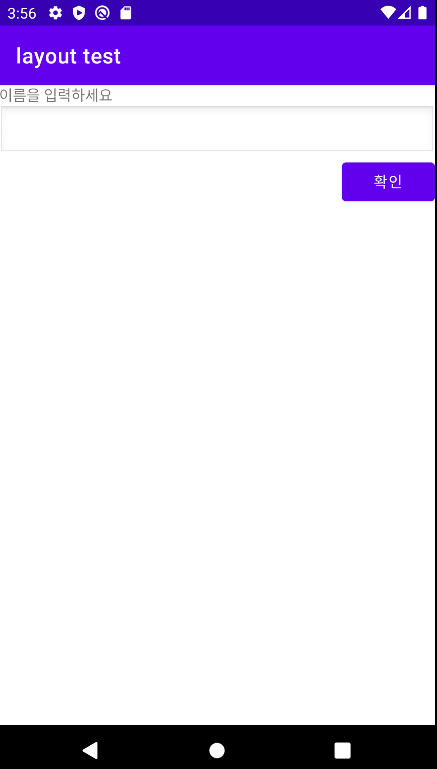
<?xml version="1.0" encoding="utf-8"?>
<RelativeLayout xmlns:android="http://schemas.android.com/apk/res/android"
    xmlns:app="http://schemas.android.com/apk/res-auto"
    xmlns:tools="http://schemas.android.com/tools"
    android:layout_width="match_parent"
    android:layout_height="match_parent"
    tools:context=".MainActivity">

    <TextView
        android:id="@+id/name"
        android:layout_width="match_parent"
        android:layout_height="wrap_content"
        android:layout_alignParentTop="true"
        android:text="이름을 입력하세요"/>
    <EditText
        android:id="@+id/input"
        android:layout_width="match_parent"
        android:layout_height="wrap_content"
        android:background="@android:drawable/edit_text"
        android:layout_below="@id/name"/>
    <Button
        android:id="@+id/btn1"
        android:layout_width="wrap_content"
        android:layout_height="wrap_content"
        android:layout_alignParentRight="true"
        android:layout_below="@id/input"
        android:text="확인"/>


</RelativeLayout>
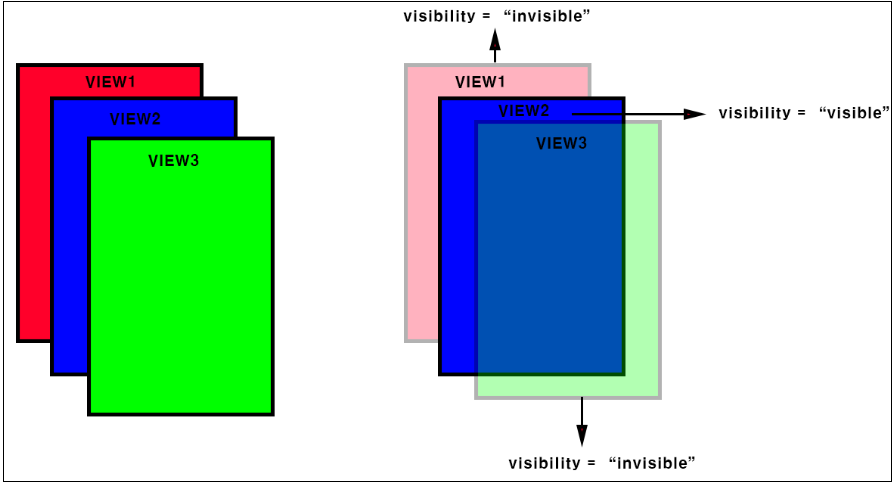
프레임 레이아웃(FrameLayout)
프레임 레이아웃 안에서 자식 뷰들은 작성된 순서대로 화면에 표시된다.
기준점은 좌측 상단으로, 자식 뷰가 여러 개이면 이전에 추가된 자식 위에 새로운 자신이 중첩되어 그려지는 느낌이다. 주로 여러 자식 뷰들을 겹쳐서 배치한 후에 뷰의 가시성(visibility) 속성을 코드로 변경하여 어떤 순간에 하나의 뷰만을 표시하게 할 때 사용한다.

'TIL > Android' 카테고리의 다른 글
| [Android] 액티비티(Activity) 간의 통신 / 인텐트(Intent)로 데이터 주고 받기 / 액티비티 추가 생성하기 (0) | 2022.11.11 |
|---|---|
| [Android] 인텐트(intent)란? / 컨텍스트(Context) /명시적 인텐트, 암시적 인텐트, 인텐트 필터 (0) | 2022.11.10 |
| [Android] 뷰 바인딩(ViewBinding)이란? / 뷰 바인딩 설정 및 사용 방법 / ViewBinding findViewById 차이점 (0) | 2022.11.10 |
| [Android] 액션바 로고 아이콘 설정 + AVD 앱 타이틀 설정 / actionbar에 앱 아이콘 삽입하기 (0) | 2022.10.20 |
| [Android] 이미지 뷰(ImageView), 이미지 버튼(ImageButton) (0) | 2022.10.05 |
| [Android] 계산기 앱 만들기 (0) | 2022.10.05 |


댓글